
Too busy to read the full user guide? Try the IDA Quick Start Guide
Overview
Welcome to the IDA service!
IDA (ida.fairdata.fi) is a research data storage service organized by the Finnish Ministry of Education and Culture and produced by CSC — IT Center for Science.
The service is intended for storing stable research data, both raw data and processed data, which is included to research datasets published in the Fairdata Etsin service. The service is offered free of charge to users affiliated with Finnish universities and polytechnics and Finnish research institutes.
This guide provides a full overview of the features and functions of the service. If you are new to the service, it is recommended that you read this guide fully before using the service.
The images below give you an overview of IDA’s browser user interface. You can also use IDA with command line tools.
Project Data Storage
Each CSC project that uses the IDA service has an allocated quota of storage space. This storage space is divided into two distinct areas: a Staging area (read/write) and a Frozen area (read-only). Both areas share the same quota, so there is no need to manage or reserve space for each use separately.
All CSC project members have equal rights to add, remove, and operate on data stored in a specific CSC project’s IDA storage space.
Users of the service may belong to one or more CSC projects.
In both areas project members can:
- view directories, files and file sizes
- download files and directories to their own computer
- share files and directories outside the service via a temporary shared link
- delete files and directories
The Staging area is intended for storing and organizing research data in preparation for storage in the frozen area.
In the staging area:
- files and folders can be added, rearranged, renamed, overwritten, and removed
- file metadata are not saved in the metadata repository Metax nor visible to other Fairdata services
- files are not replicated, so storing in the staging area doesn’t prevent data loss in case of a major hardware failure (single disk failure will not cause data loss)
The Frozen area is intended for storing stable research data in an immutable state.
In the frozen area:
- files are given unique identifiers, checksums and other file metadata stored in the metadata repository Metax
- files are replicated on another media to prevent data loss in case of a major hardware failure
- files are visible and accessible to other Fairdata services, such as for Qvain metadata tool and for the Digital Preservation Service for Research Data
Data should be moved to the frozen area once no further changes are expected to be made. Data in the frozen area is available to other Fairdata services and they can be included as a part of user-defined datasets using the Qvain metadata tool or the Metax API.
All members or the same CSC project can move data from the staging area to the frozen area, i.e. freeze it (as described below). Freezing means that the service will do procedures to preserve the data. Because of the procedures for data preservation, data in the frozen area can not be re-arranged, renamed or overwritten. Frozen data can moved back to the staging area or deleted entirely from the service, but users should be aware of the effects of these actions. If data is moved back to the staging area or deleted, the unique file identifiers and file metadata will be discarded. This means that any references to those files within any published datasets and download links to data will become permanently invalid, and the published dataset will be marked as deprecated.
Please note that IDA’s frozen area is not the same as the Digital Preservation Service. The Digital Preservation Service for Research Data (Fairdata PAS) is a separate service. IDA and Qvain can be utilized when transferring data and related metadata to Fairdata PAS. More information about the Fairdata service integrations: fairdata.fi/en/services/components/
| Staging area | Frozen area | |
|---|---|---|
| Intended use | Uploading and organizing research data in preparation for frozen storage and publication. Data can be added, moved, renamed, and deleted freely by all CSC project members. | Storing stable research data in an immutable state. Data can only be unfrozen or deleted, if needed. Data needs to included to a dataset with Qvain or Metax API and published to Etsin. |
| Users can upload, rearrange, overwrite files and directories | ✔ | ❌ |
| Users can download and delete files/directories | ✔ | ✔ |
| Users can share data with temporary links | ✔ | ✔ |
| Can be used for publishing data | ❌ | ✔ |
| File metadata saved in metadata repository Metax | ❌ | ✔ |
| Checksums generated for files | ✔ | ✔ |
| Files have unique identifiers | ❌ | ✔ |
| Files replicated on another media (recovery from major hardware failure) | ❌ | ✔ |
Monitoring and Adjusting Project Quota
To monitor the use of IDA storage space for a project go to the MyCSC customer portal and select your project from the “Projects” menu after logging in. You will see the total amount of storage space for the project, the total amount of stored data, the amount of frozen data and the number of published datasets when you click on the IDA service under the heading “Services”. If you belong to just one CSC project that uses IDA, the used quota is available in the browser UI (ida.fairdata.fi) in the root view, under the frozen and staging folder.
The Project Manager can adjust the project’s IDA quota in MyCSC customer portal. To change the project quota, log in MyCSC and select your project from “Projects” menu. In the project’s “Services” menu, find the IDA service and then click on “Configuration”. Fill in the new quota in GiB and click on “Apply”. Your quota granter organisation will handle requests to increase the quota. A request to decrease the quota will be accepted automatically.
Please note that it is only possible to adjust the IDA quota the day after the IDA storage space is is first applied to the CSC project.
Recommended Browsers
We recommend using the latest stable versions of either the Firefox, Chrome, or Edge web browsers for interacting with the IDA service web UI. We advise against using Safari due to issues when uploading files, such that hidden files or folders (i.e. files or folders beginning with a period ‘.’) cannot be uploaded to IDA reliably via the Safari browser.
In addition, when uploading data from a Mac OS-X machine, even if using Firefox or Chrome to interact with the IDA web UI, we advise using the IDA Command Line Tools with an ignore file which excludes ‘.DS_Store’ directories. See https://github.com/CSCfi/fairdata-ida-v3/tree/master/cli#ignore-file
Getting started
Logging in
Before you can log in, you need to apply for IDA storage space for you CSC project, or join an existing CSC project with IDA access.
After this, you may log in to the IDA service using either the Haka authentication, Virtu authentication service or using your CSC user account. To log in, navigate to ida.fairdata.fi.
IDA, Qvain and Etsin use a common single sign-on/sign-off (SSO) service. This means that you will log in to all of these Fairdata services when logging in once through IDA, Qvain or Etsin. Similarly, logging out will log you out of all of the above services.
To log in to the IDA service, click on the “Login” button in the top right corner of the IDA home page. On the login page presented, select either “CSC Login”, “Haka Login” or “VIRTU” and follow the instructions provided.
Note that personal CSC user accounts are created and managed via MyCSC, including changing or resetting your CSC account password.
Upon successfully logging in to the IDA service, you will be presented with the top level files view, described below.
Logging out
To log out from the IDA service, click on the icon located in the top right corner of the view, which will open a pull-down menu, and select the “Logout” menu option. On the logout page presented, click the “Logout” button. Logging out will log you out of all of the Fairdata services.
Language settings
Set the language on the IDA home page, from the top right corner, before logging in.
To change the language, you must log out of the IDA service, and on the IDA home page select another language from the top right corner of the page. The selected language will be used for all Fairdata services and will be remembered until you change it again, either on the IDA home page or in another Fairdata service. The locale used in IDA is derived from your language selection.
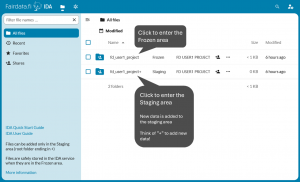
Files View
When you first log in to the IDA service, you will be presented with a file browser view showing the staging and frozen folders for all CSC projects to which you have access. The name of the frozen folder for a project will correspond to the CSC project number. The name of the staging folder for a project will correspond to the CSC project number, followed by a plus “+” character. The plus character in the staging folder name serves as a reminder that new data is added to the staging area.
The contents of a folder can be viewed by clicking on the name of the folder in the listing.
To navigate back to a parent folder, either use your web browser’s “Back” functionality, or click on the desired ancestor folder in the pathname above the listing.
To return to the top root of the files listing from a subfolder, click on “All files” at the far left of the pathname above the listing.
To return to the files view from any other view, click on the “Files” at the top of the view.
Staging Area
New files are uploaded to the staging area of a project, which is the project’s root folder ending with a plus character (“+”).
Please note that files do not need to be packaged (e.g. zipped) before they’re transferred to the service and the files can be published directly as individual files or in folder structures.
It is strongly recommended that files be organized by subfolders within the staging folder. Organizing files by e.g. time period and other logical structures can help make management of large numbers of data files easier, and freezing of data easier and more efficient, by selecting and freezing all files within a folder (see below about freezing files).
Learn more about best practices in naming and and structuring your data in CSC Docs. We recommend using common, preferably open file formats. More information about files and file formats in CSC Docs. For data that is meant to be stored for very long periods of time in the Digital Preservation Service, see the file formats in which the national digital preservation service preserves and receives digital objects. A continuous file format evaluation model is used for updating the specification.
NOTE: Files named .htaccess and files with a suffix of either .part or .filepart may not be uploaded. The filenames will need to be changed in some manner, such as zipping the file or adding some other suffix or name change. These restrictions are due to security and other internal management constraints of the underlying Nextcloud platform employed by the IDA service.
Creating Folders
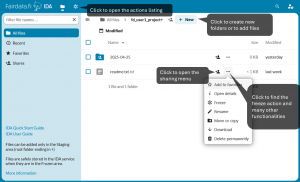
To create a new folder, click on the “+ New” button at the top of the view, to the right of the current folder path, and select the option “New folder”. Enter a name for the new folder and click “Create”.
Uploading Individual Files
To upload an individual file to the current folder, click on the “+ New” button at the top of the view, to the right of the current folder path, and select the option “Upload files”, and using the file picker presented, navigate to and select a file on your local filesystem.
Uploading Folders
To upload a folder, click on the “+ New” button at the top of the view, to the right of the current folder path, and select the option “Upload folders”, and using the file picker presented, navigate to and select a folder on your local filesystem.
Uploading Folders and Multiple Files using Drag-and-Drop
It is possible to upload entire folders (and their subfolders) and/or multiple files at the same time by using drag-and-drop.
First navigate in the files view to the folder to which you wish to upload the data, creating new subfolders as required.
Then, open your local filesystem browser, select the desired folders and/or files to upload, and drag-and-drop them into the web browser window where the IDA service is open, into the section that says “Drag and drop files here to upload”.
The selected folders and files will then be uploaded to the current folder in the files view, preserving the folder organization as stored on the local filesystem.
Moving or Copying Files or Folders inside the service
Files and folders within the staging area of a project may be freely moved or copied elsewhere in the staging area. It is also possible to copy frozen files and folders from the frozen area to the staging area.
To move or copy a file or folder, navigate in the files view to where the file or folder is located and click on the ellipsis “…” menu to the right of the file or folder name, and select the option “Move or copy”.
In the pop-up window presented, navigate to the desired target folder within the staging area and click either “Copy to <location>” or “Move to <location>”. To create a new target folder, click the plus “+ New” icon at the top of the pop-up window and enter the name of the new target folder.
Renaming Files or Folders
Files and folders within the staging area of a project may be freely renamed.
To rename a file or folder, navigate in the files view to where the file or folder is located and click on the ellipsis “…” menu to the right of the file or folder name, and select the option “Rename”.
Edit the name as desired and press “Return”.
File details and checksums
To view the details of a particular file, navigate in the files view to where the file is located and click on the ellipsis “…” menu to the right of the file or folder name, and select the option “Open details” . The file details will be shown in the tab that opens to the right side of the screen.
Checksums are generated automatically by the service, using the SHA256 algorithm, and are displayed as “sha256:” URIs in hexidecimal form. For files located in the staging area there may sometimes be a delay of up to 24 hours in the checksum generation, if you use IDA’s browser user interface to upload the files. If you are using the command line tools, the checksums are generated and recorded at the same time each file is uploaded.
After downloading a file, a local checksum can be generated for comparison with the checksum displayed, using the following command:
sha256sum filename | awk '{print $1}' | tr '[A-Z]' '[a-z]'
Downloading Files or Folders
Both individual files and entire folders can be easily downloaded from the IDA service. When downloading folders, the contents of the folder will be packaged for downloading as a single packaged archive file, which can then be unpacked after download.
To download a file or folder, navigate in the files view to where the file or folder is located and click on the ellipsis “…” menu to the right of the file or folder name, and select the option “Download”.
Follow your browser’s instructions regarding how and where to save the file on your local machine.
Deleting Files or Folders
Files and folders within the staging area of a project may be freely deleted.
To delete a file or folder (and all of its content), navigate in the files view to where the file or folder is located and click on the ellipsis “…” menu to the right of the file or folder name, and select the option “Delete permanently”.
In the confirmation dialog presented, click “Delete permanently”.
WARNING: The delete action cannot be undone. The deleted data will be permanently and irretrievably removed from the IDA service!
Freezing Files
When files reach sufficient maturity such that they are considered final and should no longer change, freeze them as described in detail below. This will render them immutable and also make them visible to you and your CSC project members in Qvain and Metax API, so that the files can be included in a published dataset. Freezing data doesn’t make them visible to people outside your project.
Both individual files and entire folders can be selected for freezing. When selecting a folder, all files within that folder, and any subfolders, will be frozen.
Freezing will move each selected file to the frozen area, preserving its relative pathname within the staging area, and making them immutable. The freeze action cannot be terminated before it is complete. Depending on the size and number of files being frozen, the background operations may take several hours. The status of the pending freeze action can be viewed in the pending actions listing as described below.
Frozen files are replicated to separate physical storage to guard against loss of data due to hardware failure. Replication employs checksum validation to ensure the integrity of the frozen file copies. If frozen files are later unfrozen or deleted, all replicated copies will be removed, i.e. all procedures done for frozen file preservation are discarded.
It is strongly recommended that you organize files by subfolders within the staging area before you freeze them. You are able to freeze a folder that contains maximum of 5000 files, but having less files in a folder makes it easier to browse and download the data. You can organize files by e.g. time period and other logical structures. Learn more about best practices in naming and and structuring your data in CSC Docs.
How to freeze files
To freeze a file or all files within the scope of a folder, navigate in the files view to the location in the staging area of the file or folder. Click on the ellipsis “…” menu to the right of the file or folder name, and select the option “Freeze”. In the confirmation dialog presented, if you are absolutely sure you wish to freeze the selected file(s), click “Freeze”.
Once the freeze action has been successfully initiated, a dialog is presented that confirms the initiation. If you wish, you can click on the pending action link shown in the dialog to view to pending action details (described in greater detail below). You will find the file(s) that you just froze from the project’s frozen area, from the relative pathname in which they were located in the staging area.
Note that the freeze action will be rejected if any pathname of any of the files to be frozen conflicts with either an already frozen file, or a file belonging to a pending action. This is to ensure against corruption of already frozen (immutable) files, and their associated metadata and identifiers.
If you wish to freeze a file which shares the same relative pathname as a frozen file, you must either rename the newer file or move it to a different location (pathname) within the staging area, or you must unfreeze or delete the previously frozen file (described further below).
If you wish to freeze a file which shares the same relative pathname as a file in a pending action, you must first wait for the pending action to be completed and then try freezing the file again.
Freezing new files when the parent folder already exists in the frozen area
When a file, or folder, is frozen, any necessary parent folders for each file will be created, as required. If those parent or ancestor folders already exist, that is OK. The relative pathname of each file being frozen will be preserved and created as required, as the file is moved from the staging area to the frozen area. As long as no file exists with the same relative pathname, the freeze operation will proceed as requested, creating all necessary parent or ancestor folders that do not already exist.
Example 1:
You have a folder in the staging area with the relative pathname /EXP1, containing several unfrozen files. You also have a folder in the frozen area with the same relative pathname /EXP1, containing several frozen files. You decide to freeze a file in the staging area with the relative pathname /EXP1/DATA_20180611.csv. The freezing process will verify that no file already exists in the frozen area with the same relative pathname, and will then move the specified file from the staging area to the frozen area. Because the folder /EXP1 already existed in the frozen area, there was no need to create it, nor was there any affect on the already frozen files located in that folder. The folder /EXP1 in the staging area, along with all of the files which have not yet been frozen, remain unchanged in the staging area.
Example 2:
You have a folder in the staging area with the relative pathname /EXP2, containing several files. There is no such folder in the frozen area. You decide to freeze a file in the staging area with the relative pathname /EXP2/DATA_20180922.csv. The freezing process will verify that no file already exists in the frozen area with the same relative pathname, and will then create the folder /EXP2 in the frozen area and move the specified file from the staging area to the frozen area. Because the folder /EXP2 did not already exist in the frozen area it was created. The folder /EXP2 in the staging area, along with all of the files which have not yet been frozen, remain unchanged in the staging area.
Frozen Area
Frozen files are located in the frozen area, which is the project folder that does not have a plus (“+”) character in the end of the CSC project number.
Frozen files are immutable, and may not be freely updated, renamed, moved, or otherwise modified the same as files in the staging area. All that may be done to frozen files is to download them, unfreeze them, or delete them entirely from the service; where the latter two options will result in their identity and metadata becoming invalid. The unfrozen or deleted file is no longer available to other Fairdata services, and any references to it in publish datasets will become invalid.
NOTE: Files are not stored persistently in the IDA service until they are frozen.
Frozen File Details
Frozen files are assigned unique identifiers, their details including checksums are stored in the centralized metadata repository Metax and they are replicated to separate physical storage.
To view the details of a particular file, navigate in the files view to where the file is located and click on the ellipsis “…” menu to the right of the file or folder name, and select the option “Open details”. The file details will be shown at the top of the tab that opens in the right side of the screen.
Note that if the file is part of a pending action, not all details will be visible, as they may not have been generated yet by the ongoing background processing.
For information about file checksums, see section “File details and checksums” above.
Unfreezing Frozen Files
If one or more frozen files need to be modified in any way, including updating, renaming, or moving, it is possible to unfreeze both individual files as well as all files within the scope of a particular folder.
Unfreezing will move each selected file back to the staging area, preserving its relative pathname within the frozen area, and making them again fully editable. The unfreeze action cannot be terminated before it is complete. Depending on the size and number of files being unfrozen, the background operations may take several hours. The status of the pending unfreeze action can be viewed in the pending actions listing as described below.
WARNING: Unfrozen files will no longer be accessible to other Fairdata services. Unfreezing makes all external references to files invalid. If the files are included to datasets defined in Qvain or Metax API, unfreezing deprecates these published datasets permanently. A warning dialog will be presented if any datasets would be deprecated by the unfreeze action. If frozen files are unfrozen, all replicated copies will be removed. The unfreeze action, once initiated, cannot be undone!
To unfreeze a file or all files within the scope of a folder, navigate in the files view to the location in the frozen area of the file or folder and click click on the ellipsis “…” menu to the right of the file or folder name, and click the option “Unfreeze”. In the confirmation dialog presented, if you are absolutely sure you wish to unfreeze the selected file(s), click “Unfreeze”. If the file is part of any published datasets, you’ll be presented a warning dialog and you can cancel the unfreeze if needed.
Once the unfreeze action has been successfully initiated, a dialog is presented that confirms the initiation. If you wish, you can click on the pending action link shown in the dialog to view to pending action details (described in greater detail below). You will find the file(s) that you just unfroze from the project’s staging area, from the relative pathname in which they were located in the frozen area.
Note that the unfreeze action will be rejected if any pathname of any of the files to be unfrozen conflicts with either any file in the staging area, or a file belonging to a pending action. This is to ensure against corruption of any files files in staging, and to permit all essential background processing to finish before like named files are refrozen, to avoid potential confusion or disruption in other services which may be utilizing frozen file metadata in some manner.
If you wish to unfreeze a file which shares the same relative pathname as a file in staging, you must either rename the file in staging or move it to a different location (pathname) within the staging area, or you must delete the file in staging.
If you wish to unfreeze a file which shares the same relative pathname as a file in a pending action, you must first wait for the pending action to be completed and then try unfreezing the file again.
Deleting Frozen Files
If one or more frozen files need to be permanently removed from the IDA service, it is possible to delete both individual frozen files as well as all frozen files within the scope of a particular folder.
The delete action cannot be terminated before it is complete. Depending on the size and number of frozen files being deleted, the background operations may take several hours. The status of the pending delete action can be viewed in the pending actions listing as described below.
WARNING: Deleted files will be permanently and irretrievably removed from the IDA service, and will no longer be accessible to other Fairdata services, making all external references to them invalid. If the files are included to datasets defined in Qvain or Metax API, deleting deprecates these published datasets permanently. A warning dialog will be presented if any datasets would be deprecated by the delete action. If frozen files are deleted, all replicated copies will be removed. The delete action, once initiated, cannot be undone!
To delete a file or all files within the scope of a folder, navigate in the files view to the location in the frozen area of the file or folder and click click on the ellipsis “…” menu to the right of the file or folder name, and click the option “Delete permanently”. In the confirmation dialog presented, if you are absolutely sure you wish to unfreeze the selected file(s), click “Delete”. If the file is part of any published datasets, you’ll be presented a warning dialog and you can cancel the unfreeze if needed.
Once the delete action has been successfully initiated, you will be presented with a confirmation, and by clicking on the pending action link shown in the dialog, you may open the action summary (described in greater detail below).
Note that the delete action will be rejected if any pathname of any of the files to be unfrozen conflicts with a file belonging to a pending action. This is to permit all essential background processing to finish before like named files are deleted, to avoid potential confusion or disruption in other services which may be utilizing frozen file metadata in some manner.
If you wish to delete a file which shares the same relative pathname as a file in a pending action, you must first wait for the pending action to be completed and then try deleting the file again.
Share Links
There are two types of sharing links: internal and external, as described in more detail below. Internal sharing links do not expire, but they only work for IDA users who belong to the same CSC project, and they are intended to facilitate data sharing among IDA users. External links allow data to be downloaded by individuals outside the service, and they are valid for up to 90 days from the time of creation.
Internal Share Links
You can create internal sharing links for either individual files or entire folders. Internal sharing links only work for IDA users who belong to the same CSC project. Creating internal sharing links for files and folders is possible both in the preparation area and the frozen area.
Internal sharing links can be used, for example, when you want a colleague who uses the IDA service and belongs to the same CSC project to easily and quickly find a specific file or folder.
To create an internal sharing link for a file or folder, navigate in the files view to the location of the file or folder. Click the file share icon to the right of the file or folder name (the file sharing icon has a plus sign and a person icon). This opens the sharing menu on the right side of the browser view. In the sharing menu, click the copy link icon to the right of the ‘Internal link’ text to create a new internal sharing link. The link is copied to the clipboard.
Note, that when your browser window is narrow, the share icon is located in inside the ellipsis menu (“…”).
Temporary External Share Links
You may create temporary external download-only share links to either individual files or entire folders, which will be valid for a period of at most 90 days, and may optionally be assigned a required password to access, as well as other options described below. Temporary external links may be created for files or folders in either the staging or frozen area.
This is useful for providing temporary access to data, either during final review of data in the staging area, prior to freezing, or data in the frozen area prior to inclusion in and publication of a dataset.
WARNING: Temporary external share links should not be published nor used in citations or as public download links! They are intended for limited, short-term, unofficial use only.
To create an internal sharing link for a file or folder, navigate in the files view to the location of the file or folder. Click the file share icon to the right of the file or folder name (the file sharing icon has a plus sign and a person icon). This opens the sharing menu on the right side of the browser view. In the sharing menu, click on the plus (“+”) icon to the right of the ‘Create public link’. A pull-down menu will appear, showing the expiration date of the newly created link in 90 days, and offering the option of specifying a shorter expiration period if desired by clicking on the predefined 90 day expiration date and selecting an earlier date. To create the link, click “Create share”, else click “Cancel”.
Once the link is created, it will be automatically copied to the browser clipboard, so that you may provide the link to whomever you wish to allow temporary download-only access to the data via that link.
Additionally, you can further configure the link options via the ellipsis menu (“…”) to the right of the link. In the menu, select “Customize link”
- If you want to give a name for the share link, write it in the field ‘Share label’ and click on “Update share”.
- To optionally require a password to access the data, select “Set password” and enter the desired password in the field provided, and click on “Update share”.
- To change the expiration date, select a new date by clicking on the date field and click on “Update share”.
- To optionally provide a note which will be visible to external users using the link, select “Note to recipient” and enter the desired note in the field provided, and click on “Update share”.
The link URL may be later copied again to the clipboard by clicking on the copy icon to the left of the ellipsis menu of the link.
It is not possible to make changes to or delete shared data through a temporary external sharing link.
To disable an existing external share link, open the link options pull-down menu by clicking the ellipsis menu (“…”) of the link, and select “Unshare”. The link will be immediately deactivated and discarded.
To create an additional share link, e.g. with different link options, select “Add another link” from the ellipsis menu (“…”) of the link.
WARNING: There is no confirmation before disabling a temporary external share link. Disabling a temporary share link cannot be undone and the previous share link cannot be retrieved. If you still desire the file or folder to have a temporary share link, a new share link will need to be created by checking the option, and provided to all persons who should use the link.
Note that temporary share links are specific to each IDA user, and cannot be seen nor modified by other CSC project members. It is the responsibility of each project member to inform other project members about, and coordinate the creation and management of, temporary share links, and to observe any organization and/or project-specific policies concerning such links.
Favorites
Files or folders which are frequently in use can be marked as “favorites” so that they can be accessed more easily and directly than browsing to their location in the files view.
Favorite files and folders are easily accessed by selecting the “Favorites” view from the left hand navigation of the files view.
To mark a file or folder as “favorite”, click the ellipsis menu (“…”) to the right of the file or folder name and click on “Add to favorites”. The file or folder will be added to the “Favorites” view.
To remove a file or folder from the “Favorites” view, click the ellipsis menu (“…”) to the right of the file or folder name and click on “Remove from favorites”.
Action Listings
During file freeze, unfreeze and frozen file deletion, the IDA service performs numerous background operations. This minimizes the amount of time users need to spend interacting with the service, waiting for an action to complete.
The IDA service provides easy access to listings of actions, ordered by most recently initiated to least recently initiated, and organized by status as described below.
To view all available action listings, click on the snowflake icon (‘Actions’) in the top navigation bar.
The default action listing will be displayed, showing all pending actions.
To view the details of a particular action shown in a particular listing, click on the action identifier link. The time at which each individual background operation was completed is shown in green in the field “Completed”. If the action is a failed action, the cause for the failure will be clearly indicated in red. The files associated with the action will be listed in the lower part of the summary.
Pending Actions
Once initiated, an action is pending until all background operations are completed, or some unrecoverable error is encountered. As individual operations are completed, the status of the pending action is updated accordingly, and can be monitored by regularly updating the summary view for the action.
To view all pending actions, open the actions listing section by clicking on the snowflake icon (‘Actions’) in the top navigation bar as described above, or if already in the action listings section and another action status listing is shown, click “Pending” in the left hand navigation.
Completed Actions
After all background operations have been completed successfully, an action is complete.
To view all completed actions, open the actions listing section by clicking on the snowflake icon (‘Actions’) in the top navigation bar as described above, or if already in the action listings section and another action status listing is shown, click “Completed” in the left hand navigation.
Failed Actions
If any background operation fails to complete successfully, the action is flagged as a failed action, and the cause of the failure will be clearly indicated in the action summary.
To view all failed actions, open the actions listing section by clicking on the snowflake icon (‘Actions’) in the top navigation bar as described above, or if already in the action listings section and another action status listing is shown, click “Failed” in the left hand navigation.
Retrying Failed Actions
Failed actions may be retried, such that the sequence of background operations will be resumed from the point that the previous operation failed. This assumes that the underlying cause of the failure has been resolved, possibly with the assistance of the IDA support staff.
When retrying a failed action, the original failed action will be marked as “cleared” and a new action will be created, based on the failed action, and initiated. The original action summary will then show a link to this new retry action. In this manner, an action may be retried any number of times, with the multiple actions linked to each attempt accordingly (as the retried action may either succeed and be marked completed, or fail for the same or some other reason).
To retry a failed action, click “Retry” to the right of the action in the failed action listing, or within the action summary of the failed action.
Cleared Actions
Cleared actions are failed actions which have either been retried or simply abandoned. If the action was retried, a link to the retry action will be present in the action summary.
To view all cleared actions, open the actions listing section by clicking on the snowflake icon (‘Actions’) in the top navigation bar as described above, or if already in the action listings section and another action status listing is shown, click “Cleared” in the left hand navigation.
Notification icons
Notification icons will appear in the top navigation bar, to the right of the Actions menu option, when any of the following conditions apply:
 |
There are one or more pending actions |
|---|---|
 |
There are one or more failed actions |
Note that if a user belongs to multiple projects, the relevant icons will appear if the condition exists for any of the projects to which the user belongs.
Clicking on a notification icon will open the appropriate actions listing view, via which more information will be available, such as the project with which each pending or failed action is associated, providing links to the action details.
Collision Avoidance for File Operations
All users belonging to a given project have the same rights, and may interact with, add, and remove project data concurrently. To help avoid one user unintentionally interfering with another user’s activity, the IDA service employs a number of checks and restrictions to ensure that multiple concurrent users’ activities do not collide in undesirable ways.
Under normal circumstances, encountering any of these potential collisions should be very rare; however, guarding against such potential collisions helps to maintain data integrity in both the staging and frozen areas.
These checks only apply to actions which are still being initiated. Once an action is fully initiated, even if still pending while the service fully processes the action, it will not block new actions from being initiated.
For example, if a user attempts to initiate a freeze action for one or more files in the staging area, and one or more files with the same relative pathname already exist in the frozen area, the action will be rejected. Likewise, if a user attempts to initiate an unfreeze action for one or more files in the frozen area, and one or more files with the same relative pathname exist in the staging area, the action will be rejected.
These checks for existing file collisions help to ensure that users do not accidentally or unintentionally overwrite or modify files, especially files that are already frozen and may belong to one or more datasets. The user must decide how best to remove, rename, or move files in the staging and/or frozen areas so that there is no intersection of relative pathnames; after which the action can be tried again.
For example, if one or more frozen files are deleted from the frozen area, new files with the same pathnames cannot yet be frozen, even though such files have been physically deleted and are no longer in the frozen area, until all associated metadata records for the deleted files are updated accordingly.
For example, if a user has initiated a freeze action on a folder in the staging area, it will not be possible to upload files to, delete files from, or rename or move files which are in the scope of the folder being frozen, until the freeze action has been fully initiated and the folder moved to the frozen area. Once the freeze action has been fully initiated, even if still pending while the service fully processes the action, users will be free to recreate the same named folder in the staging area and begin uploading new files into that folder.
Similarly, if a user is unfreezing a folder, users will not be able to create or upload a like named folder to staging at the same time, as the service will be in the process of moving the files within the scope of the frozen folder from the frozen area to the staging area, and thus any file operations in staging in a same named folder scope could conflict with that unfreeze action.
Command Line Tools
Tools for interacting with data via the command line are available for download from a public GitHub repository: https://github.com/CSCfi/fairdata-ida-v3/tree/master/cli. They are compatible with most UNIX-like platforms (Linux, OS-X, etc),
Uploading, downloading, moving (renaming), and deleting of files and folders to/from a project’s staging area are supported. Downloading frozen data and retrieving information about frozen files is also supported.
Freezing files and unfreezing or deleting frozen files, however, require use of the IDA web UI as described above, and these actions cannot be performed from the command line.
To get you started, see video tutorials for Installation and Configuration, Uploading and Validation of Data and for Working with Frozen Data.
App passwords
The IDA Command Line Tools must be provided with valid IDA account credentials in order to access the project space. The username will be your CSC account username, as managed in the CSC Customer Portal https://my.csc.fi/. The password will be an application password that you create in the IDA service. Instructions for creating a app password can be found in IDA Command Line Tool GitHub repository.
Using IDA with other CSC services
If you’re using IDA with CSC supercomputers or Allas, you can find instructions also from CSC Docs:
- Using IDA with Puhti (CSC Docs)
- Accessing IDA via Puhti’s and Mahti’s graphical web interface (CSC Docs)
- Copying data between Allas and IDA via Puhti (CSC Docs)
If you have any questions about particular features, or any other issue relating to the service, please contact IDA support at servicedesk (a) csc.fi